Getting my Tuesday post up a bit later than I had hoped, but for a good reason. After hearing yet another story about photos being lost my computer was consumed last night with backing up all our photos online. I tried to simultaneously blog but it just wasn't happening.
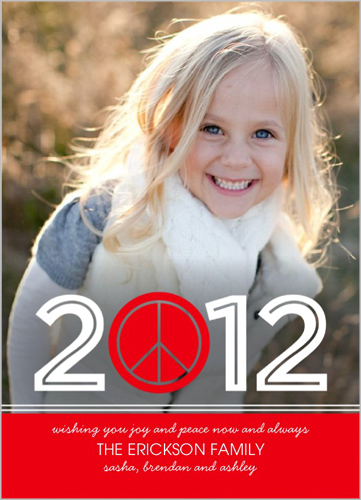
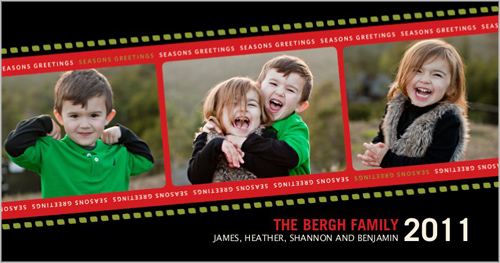
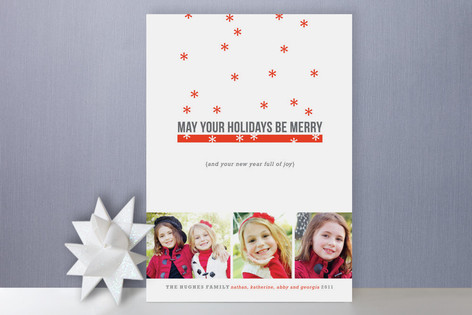
I was struck this year by how cool the designs were on many of the holiday cards we received. I've flagged a few of them for design inspiration. I don't want to share the actual cards here without my friends' permission, so I'm pulling the stock images from the card companies' websites so that I can share with you here my three favorite designs. I haven't made anything inspired by them yet, but ideas from these cards are bound to turn up here sooner or later! :)
1. I loved the idea here of placing a title on the photo and replacing one of the letters with a graphic icon. I love how the numbers and peace sign have cut-out lines in their centers, allowing bits of the photo to peek through. I am thinking this type of effect would be pretty easy to replicate with my Cameo. This card is a Petite Lemon card from Shutterfly:
2. I adore the diagonal lines on this one and the fun filmstrip look. This is Pottsdesign card from Shutterfly:
3. Imagine my surprise when I received this card from a non-scrapbooking friend, who had chosen one of Kim Morgan's (a former fellow Write.Click.Scrapbook. team member) designs from Minted! :) I love the positive/negative effect with the red and white snowflakes and love all the white space:
Forget Pinterest, I think I need to start browsing all of the card websites for design inspiration! Did you get or give a card this year that provides good design inspiration? If so, leave the link to it in the comments here!
Tuesday, January 10, 2012
Monday, January 9, 2012
Monday Make Something: Blog Layout
Today I participated in Wilna Furstenburg's Monday Challenge over on the October Afternoon blog. Her challenge is to create a layout about your 2012 creative goals. I decided to create a layout about my 2012 blogging goals. It's a very simple layout centered around my blog header printed out on photo paper:
I am pondering some other 2012 creative goals as well. I'm not sure that I'm ready to commit to them just yet, though! If I do I'll be sure to let you know.
![]() | |
| Cardstock:Bazzill Basics + Patterned Paper:October Afternoon + Chipboard:October Afternoon + Stickers:October Afternoon + Baker's Twine:October Afternoon + Pen:Sakura + Font: TW Cen MT |
Friday, January 6, 2012
Friday Fabulous Find: The Colour Suite
I have long been a fan of Scrapbook & Cards Today (if you don't know it, it's a Canadian magazine), and have also long been a fan of Summer Fullerton's clean-lined and colorful work. Therefore, I was thrilled when the two came together in a big way last summer when Scrapbook & Cards Today launched The Colour Suite challenge on their website. I've been popping over there to ogle the gorgeous color combos and Summer's work ever since. I checked with Summer and she promised me that the challenge is continuing in 2012!
So...if you haven't already clicked on The Colour Suite, go ogle!
Thursday, January 5, 2012
Thrifty Thursday: Start With A Collection You Love
One of my all-time favorite paper collections ever was Cosmo Cricket's The Boyfriend line:
The Boyfriend included a fun mix of school-themed papers and embellishments along with lots of funky icons related to music, video games, etc. and also had some basic striped, grid, and lined papers. Basically, The Boyfriend fit my description of a perfect paper line: bright colors + basic patterns + whimsical designs + paper you can journal on (are you listening, manufacturers? :)). I love lines like this because you can use them in so many different ways.
One of the benefits of being a very simple scrapper is that even when I've used a collection on many layouts and cards I have a lot left over. I go through my papers and purge things once or twice a year, but some products I just can't give away. But...do I ever go back and use them? Rarely.
(Note for those non-scrapbookers reading this: there is huge product turnover in the papercrafting industry. There are two major trade shows a year, one in January and one in July. Most manufacturers produce 2-4 new lines per show and in the last couple of years there's also been a trend to have a "mid-release" line or two that come out between shows. Product is considered old by the time the next trade show rolls around, and ancient after a year.)
So...enter this whole Thrifty Thursday concept. Every Thursday I'm going to attack my stash of older products from a different viewpoint (until I run out of viewpoints, and then I'll run through them again with more things from my stash :)). This week I started with a collection I loved: The Boyfriend (shh...don't tell my husband about The Boyfriend...).
I pulled out the papers and thought about what to scrap. I decided that this line would be a perfect starting place for a photo-less layout about our recent visit to the Grammy Museum in Los Angeles. From there I went crazy. Here's the layout:
Here's my process.
1. I downloaded a fun dingbat font from dafont called Dance Floor Exit. I used my Cameo to cut out five dancing figures and layered them with pop dots on the yellow tone-on-tone audiotape patterned paper from The Boyfriend. I also added a strip of striped paper and a handcut boom box and speech bubble from the same collection. I added some more recent Lily Bee alpha stickers to the speech bubble.
2. Next, I went digging through all of my old Thickers for a set that would work and chose the Dolce font in Apricot.
3. After adding some of the tickets from our visit and the handcut pieces from The Boyfriend, I though I needed some more embellishments and started digging through my stash. The old star sticker from Sassafrass surfaced, as did the "so cool" epoxy sticker from Creative Imaginations.
4. The star looked like it wanted company, so I tried to remember whether I had any older star paper and came up with this bit from American Crafts.
I started with an older collection I love, and ended up digging into products from five different manufacturers (six if you count the cardstock). I created a layout I love that doesn't look dated to me even though I used some old and some ancient products.
So...if this idea appeals to you and you want to play along, start with an older collection you love and go from there. In fact, if you are playing along, comment here and tell me what older collection you love (hey, I could use some more inspiration!), and then, if you do create something, come back here and link me up in the comments.
By the way, when Sadie saw The Boyfriend she loved him, too. (I wasn't expecting that for another decade or so.) She started to make her own layout about the Grammy Museum but isn't done yet. I'll post it on my blog once she's done.
![]() |
| Normally I would link to the paper on the company's website, but they only show a couple of pieces since it's an older line. Lucky for you, I found this image online that shows the whole collection! |
One of the benefits of being a very simple scrapper is that even when I've used a collection on many layouts and cards I have a lot left over. I go through my papers and purge things once or twice a year, but some products I just can't give away. But...do I ever go back and use them? Rarely.
(Note for those non-scrapbookers reading this: there is huge product turnover in the papercrafting industry. There are two major trade shows a year, one in January and one in July. Most manufacturers produce 2-4 new lines per show and in the last couple of years there's also been a trend to have a "mid-release" line or two that come out between shows. Product is considered old by the time the next trade show rolls around, and ancient after a year.)
So...enter this whole Thrifty Thursday concept. Every Thursday I'm going to attack my stash of older products from a different viewpoint (until I run out of viewpoints, and then I'll run through them again with more things from my stash :)). This week I started with a collection I loved: The Boyfriend (shh...don't tell my husband about The Boyfriend...).
I pulled out the papers and thought about what to scrap. I decided that this line would be a perfect starting place for a photo-less layout about our recent visit to the Grammy Museum in Los Angeles. From there I went crazy. Here's the layout:
![]() |
| Cardstock (Bazzill Basics) + Patterned Paper (Cosmo Cricket, American Crafts) + Stickers (Lily Bee, Sassafrass, American Crafts, Creative Imaginations) + Font (Dance Floor Exit) |
Here's my process.
1. I downloaded a fun dingbat font from dafont called Dance Floor Exit. I used my Cameo to cut out five dancing figures and layered them with pop dots on the yellow tone-on-tone audiotape patterned paper from The Boyfriend. I also added a strip of striped paper and a handcut boom box and speech bubble from the same collection. I added some more recent Lily Bee alpha stickers to the speech bubble.
2. Next, I went digging through all of my old Thickers for a set that would work and chose the Dolce font in Apricot.
3. After adding some of the tickets from our visit and the handcut pieces from The Boyfriend, I though I needed some more embellishments and started digging through my stash. The old star sticker from Sassafrass surfaced, as did the "so cool" epoxy sticker from Creative Imaginations.
4. The star looked like it wanted company, so I tried to remember whether I had any older star paper and came up with this bit from American Crafts.
I started with an older collection I love, and ended up digging into products from five different manufacturers (six if you count the cardstock). I created a layout I love that doesn't look dated to me even though I used some old and some ancient products.
So...if this idea appeals to you and you want to play along, start with an older collection you love and go from there. In fact, if you are playing along, comment here and tell me what older collection you love (hey, I could use some more inspiration!), and then, if you do create something, come back here and link me up in the comments.
By the way, when Sadie saw The Boyfriend she loved him, too. (I wasn't expecting that for another decade or so.) She started to make her own layout about the Grammy Museum but isn't done yet. I'll post it on my blog once she's done.
Wednesday, January 4, 2012
Wednesday We: Winter Break Ends
Yesterday was the last day of winter break. I took the entire two and a half weeks off with the kids, which was lovely. Seth had the time off as well. Or, more accurately, I should say he was free of scheduled commitments, as he spent most of his "vacation" crunching numbers and writing. (In case I haven't mentioned it before, he's a professor of political science.)
We had a nice break, with a four-day trip to Los Angeles to see family and friends, Hanukkah celebrations in Los Angeles and back at home, and our first Christmas dinner ever thanks to an invitation from old friends who recently moved to our neck of the woods. We rented lots of movies and saw "The Adventures of Tintin" in the theater, read, played games, made art, had playdates, baked, cooked, and took on a lot of major cleaning and purging projects.
We celebrated the last day of vacation by having lunch out at Sadie's favorite Chinese restaurant, recorded for posterity in this iPhone egg drop soup photo:
The kids also spent hours today with their Ed Emberley book drawing pirates and penguins and pandas. Clearly, they were stuck on "P"s! I used to draw from Ed Emberley books when I was a kid and it's neat to see the next generation doing the same thing.
The evening was all about the Iowa caucuses. Seth follows major election events closely for his research and teaching, and can, like tonight, usually be found following such events sitting on the couch with the TV on, his laptop on his lap, and his iPhone in his hand. It's so funny how the kids get sucked in as well. When I tucked Eli into bed he wanted me to come back upstairs in ten minutes to let him know what percentage of the votes were in yet and who was ahead.
I think today is going to be a little hard for all of us as we return to reality, but I'm sure that we'll have settled back into the routine within a day or two.
Stay tuned for tomorrow's first Thrifty Thursday, when I will dig back into my stash of products and start using up some of the stuff I can't bear to part with.
We had a nice break, with a four-day trip to Los Angeles to see family and friends, Hanukkah celebrations in Los Angeles and back at home, and our first Christmas dinner ever thanks to an invitation from old friends who recently moved to our neck of the woods. We rented lots of movies and saw "The Adventures of Tintin" in the theater, read, played games, made art, had playdates, baked, cooked, and took on a lot of major cleaning and purging projects.
We celebrated the last day of vacation by having lunch out at Sadie's favorite Chinese restaurant, recorded for posterity in this iPhone egg drop soup photo:
![]() |
| Note: Sadie's lunch did not come with soup; she stole mine. |
The kids also spent hours today with their Ed Emberley book drawing pirates and penguins and pandas. Clearly, they were stuck on "P"s! I used to draw from Ed Emberley books when I was a kid and it's neat to see the next generation doing the same thing.
The evening was all about the Iowa caucuses. Seth follows major election events closely for his research and teaching, and can, like tonight, usually be found following such events sitting on the couch with the TV on, his laptop on his lap, and his iPhone in his hand. It's so funny how the kids get sucked in as well. When I tucked Eli into bed he wanted me to come back upstairs in ten minutes to let him know what percentage of the votes were in yet and who was ahead.
I think today is going to be a little hard for all of us as we return to reality, but I'm sure that we'll have settled back into the routine within a day or two.
Stay tuned for tomorrow's first Thrifty Thursday, when I will dig back into my stash of products and start using up some of the stuff I can't bear to part with.
Tuesday, January 3, 2012
Tuesday Technique: Skewer It
Can you believe it? I am actually back today. Not only that, but I now have a fun blog header (check it out!) and this is my fourth blog post in five days. Whoa! I hardly recognize myself! :)
This is my first Tuesday post of 2012. If you remember way back to yesterday, I outlined my weekday blogging plan, which included sharing a tip or technique on Tuesdays. Enter National Skewer Day (I just made that up in case any of you are running off to Google it)...
Wooden skewers are my new go-to supply. "Why?" you might ask. Well, flags are one of the current popular trends in scrapbooking. Several manufacturers are producing pre-made flags with toothpicks, like October Afternoon's Little Flyers (Farmhouse collection shown here):
or these Toothpick Flags from Pebbles (With Love collection shown here):
I created the flags by cutting strips of patterned paper, notching the ends, and then wrapping the straight sides of the flags around the skewers and gluing them in place. I cut the pointed tips off of the skewers with my sharp craft scissors and also used my scissors to trim the skewers to different lengths. Once made and tied together into a simple bouquet, the flags made for a fun summertime embellishment on this layout.
I returned to this technique a few months later with a layout that made it into my top ten layouts of 2011:
On this layout I used the skewers with premade flag sticker embellishments (the Little Flyers referenced above - these are from October Afternoon's Sidewalks collection). I will admit that it does take a little bit of manipulation and a lot of glue dots to get the flag bouquet just right, but it doesn't take more than 5-10 minutes total.
I recently went mid-length with skewers (halfway between tree and toothpick) on this birthday card:
Now I am (not-so-) patiently waiting for the manufacturers to get on board with my trend so that I can stop raiding my kitchen for embellishments! :) A girl can hope, right? (Or maybe there's a company I don't know of already doing this? If so, let me know!)
If you create anything with skewers, link me up! I'd love to see whatever you do!
This is my first Tuesday post of 2012. If you remember way back to yesterday, I outlined my weekday blogging plan, which included sharing a tip or technique on Tuesdays. Enter National Skewer Day (I just made that up in case any of you are running off to Google it)...
Wooden skewers are my new go-to supply. "Why?" you might ask. Well, flags are one of the current popular trends in scrapbooking. Several manufacturers are producing pre-made flags with toothpicks, like October Afternoon's Little Flyers (Farmhouse collection shown here):
or these Toothpick Flags from Pebbles (With Love collection shown here):
I've also seen several layouts using stick pins in place of toothpicks, which looks pretty cool (I jumped on board that trend as well).
While I love using small flags, sometimes I crave an embellishment on a grander scale. I happened to be pondering this last summer...when we were grilling a lot of shrimp...on skewers...which led to my first use of giant flags:
I returned to this technique a few months later with a layout that made it into my top ten layouts of 2011:
![]() |
| Supplies: Cardstock (Bazzill Basics) + Patterned Paper (October Afternoon) + Stickers (October Afternoon) + Baker's Twine (Divine Twine) + Fonts (Typenoksidi, Lobster 1.4) + Skewers |
I recently went mid-length with skewers (halfway between tree and toothpick) on this birthday card:
![]() |
| Supplies: Cardstock (Bazzill Basics) + Patterned Paper (Echo Park) + Stickers (Echo Park) + Baker's Twine (Divine Twine) + Skewers |
If you create anything with skewers, link me up! I'd love to see whatever you do!
Monday, January 2, 2012
The New and Improved "Right Side Up"
(First, an explanation of the new and improved "Right Side Up." Then, below the dotted line, the first official Monday post of 2012.)
I will freely admit that I have been a bad blogger. I started my blog when Sadie was three and Eli was in kindergarten. At that time, I was also working twenty-plus hours a week as an educational consultant, and had just started to find my way in the scrapbook industry. To say I was busy was an understatement. I named my blog "Right Side Up" because that was my goal at a time when everything felt upside down.
Six months later, however, a new kind of busy blew the old kind of busy out of the water when I went back to work full time in the summer of 2008 working year-round as a curriculum coordinator for my local school district. Sadie was three and Eli was in first grade. I was trying to be a good mom, meet all of my work obligations, and still keep a hand in the scrapbook industry. So...the blog became an afterthought.
Fast-forward to 2012. I'm back to working part-time as an educational consultant. Now, however, on days that I'm not working, both my kids are in school, so there's time for me to breathe a bit. Okay, so I apparently don't know how to breathe a bit, since now that I'm working less I've taken on additional scrapbook commitments as well as volunteer commitments at my kids' school. I keep trying to find a better balance, but true work-life balance is pretty elusive! I must be getting closer, though, since I seem to be finding time to do nearly everything I need to do and most of what I want to do as well. (Except for that pesky exercise thing...)
Now that you know the history of my poor, neglected blog, let's move on to the future. I've created a set weekday blog routine, which will help me to post and share life/layouts/cards/projects regularly. Please know that this blog is a work in progress, and I'm giving myself permission to start my weekly routine without yet having a flashy banner at the top or a cooler blog design. I fully intend to add an actual banner sometime this week and will update the design when I find the time and inspiration to do so.
So, without further ado, here's what you can expect to see from me each week:
Monday: Makings
On Mondays I'll share something I've made recently. Some weeks this will be a layout, other weeks it will be a card or a home decor project.
Tuesday: Tips & Techniques
Every Tuesday I'll share something cool I've learned, a new way to use something, or a helpful hint. Be prepared: this might be Silhouette-Cameo-heavy at first, as I'm still very much in the honeymoon phase with my week-and-a-half-old toy. :) I do not claim to be an expert at anything, but will share things that I've found helpful or cool.
Wednesday: We
On Wednesdays you'll get a glimpse into my family's life, whether it's something funny one of my kids said or a recipe I want to share or a summary of a trip we've taken, or...(you get the idea). This might or might not be accompanied by a layout.
Thursday: Thrifty Thursday
I have an embarrassingly large stash of older products that I still love and can't bear to part with, but never use. On Thursdays you'll see me digging into that stash to make a card or a layout or some other project.
Friday: Fabulous Find(s)
On Fridays I'll share something fabulous I've found. It might be a scrapbooker whose work I love or an inspiration piece or a website or a product.
**********************************************************************************************
Okay, now on to the first "Monday Makings" post:
Today is the launch of the January gallery at Write.Click.Scrapbook. The theme this month is "Today." You'll see that everyone interpreted that a little differently. I took this as an opportunity to document bringing my 6-year-old daughter into the family tradition of making Kiva loans. (It was also an opportunity for me to use my Silhouette Cameo...heavily):
Two of the elements on this page were ways for me to test out different ways of using the Cameo.
Let's start with the globe. I started by sizing the globe to 4" in diameter and cut it out of the green woodgrain paper. Next, I used the offset feature in the Silhouette software to create a circle to place behind the globe. Once I'd created the circle, I resized it to be the same size as the globe itself, making the perfect ocean background I was looking for. After I'd cut the offset shape from blue grid paper, I used foam adhesive to attach the two layers together. This created a cool shadow effect with the land part of the globe raised above the ocean part.
The second element I played around with was the banner. First, I cut the banner out of black cardstock. Next, I did my first welded cut. I wrote out the three words and welded the letters in each word together. After each word was welded, I grouped the three words together as one shape, resized them to fit inside the banner shape, and cut them out of the same ledger paper I'd used for the title file folder. Here's where I learned two things: 1) I had sized the words the same length as the banner, but forgot that the "V" was cut out of it, so I had to turn the "the" sideways to make it fit (which made it look cooler, at least in my opinion, so it wasn't such a bad error); and 2) I realized that I could have avoided the error by making the words a cut-out within the banner shape, cutting that out of black cardstock, and then cutting out a solid same-sized banner shape from the ledger paper and gluing it to the back of the black banner shape with the cut-out words. I'm glad I didn't figure out lesson #2 earlier, though, as I do like that sideways word, which would never have happened if I had already learned lesson #2.
So...there you have it, my first post of 2012. If anyone is actually reading this, please feel free to leave a comment if there's anything specific you'd like to see me post about this year and I'll do my best to incorporate requests in my 2012 blogging.
Hope your 2012 is off to a good start!
I will freely admit that I have been a bad blogger. I started my blog when Sadie was three and Eli was in kindergarten. At that time, I was also working twenty-plus hours a week as an educational consultant, and had just started to find my way in the scrapbook industry. To say I was busy was an understatement. I named my blog "Right Side Up" because that was my goal at a time when everything felt upside down.
Six months later, however, a new kind of busy blew the old kind of busy out of the water when I went back to work full time in the summer of 2008 working year-round as a curriculum coordinator for my local school district. Sadie was three and Eli was in first grade. I was trying to be a good mom, meet all of my work obligations, and still keep a hand in the scrapbook industry. So...the blog became an afterthought.
Fast-forward to 2012. I'm back to working part-time as an educational consultant. Now, however, on days that I'm not working, both my kids are in school, so there's time for me to breathe a bit. Okay, so I apparently don't know how to breathe a bit, since now that I'm working less I've taken on additional scrapbook commitments as well as volunteer commitments at my kids' school. I keep trying to find a better balance, but true work-life balance is pretty elusive! I must be getting closer, though, since I seem to be finding time to do nearly everything I need to do and most of what I want to do as well. (Except for that pesky exercise thing...)
Now that you know the history of my poor, neglected blog, let's move on to the future. I've created a set weekday blog routine, which will help me to post and share life/layouts/cards/projects regularly. Please know that this blog is a work in progress, and I'm giving myself permission to start my weekly routine without yet having a flashy banner at the top or a cooler blog design. I fully intend to add an actual banner sometime this week and will update the design when I find the time and inspiration to do so.
So, without further ado, here's what you can expect to see from me each week:
Monday: Makings
On Mondays I'll share something I've made recently. Some weeks this will be a layout, other weeks it will be a card or a home decor project.
Tuesday: Tips & Techniques
Every Tuesday I'll share something cool I've learned, a new way to use something, or a helpful hint. Be prepared: this might be Silhouette-Cameo-heavy at first, as I'm still very much in the honeymoon phase with my week-and-a-half-old toy. :) I do not claim to be an expert at anything, but will share things that I've found helpful or cool.
Wednesday: We
On Wednesdays you'll get a glimpse into my family's life, whether it's something funny one of my kids said or a recipe I want to share or a summary of a trip we've taken, or...(you get the idea). This might or might not be accompanied by a layout.
Thursday: Thrifty Thursday
I have an embarrassingly large stash of older products that I still love and can't bear to part with, but never use. On Thursdays you'll see me digging into that stash to make a card or a layout or some other project.
Friday: Fabulous Find(s)
On Fridays I'll share something fabulous I've found. It might be a scrapbooker whose work I love or an inspiration piece or a website or a product.
**********************************************************************************************
Okay, now on to the first "Monday Makings" post:
Today is the launch of the January gallery at Write.Click.Scrapbook. The theme this month is "Today." You'll see that everyone interpreted that a little differently. I took this as an opportunity to document bringing my 6-year-old daughter into the family tradition of making Kiva loans. (It was also an opportunity for me to use my Silhouette Cameo...heavily):
Two of the elements on this page were ways for me to test out different ways of using the Cameo.
Let's start with the globe. I started by sizing the globe to 4" in diameter and cut it out of the green woodgrain paper. Next, I used the offset feature in the Silhouette software to create a circle to place behind the globe. Once I'd created the circle, I resized it to be the same size as the globe itself, making the perfect ocean background I was looking for. After I'd cut the offset shape from blue grid paper, I used foam adhesive to attach the two layers together. This created a cool shadow effect with the land part of the globe raised above the ocean part.
The second element I played around with was the banner. First, I cut the banner out of black cardstock. Next, I did my first welded cut. I wrote out the three words and welded the letters in each word together. After each word was welded, I grouped the three words together as one shape, resized them to fit inside the banner shape, and cut them out of the same ledger paper I'd used for the title file folder. Here's where I learned two things: 1) I had sized the words the same length as the banner, but forgot that the "V" was cut out of it, so I had to turn the "the" sideways to make it fit (which made it look cooler, at least in my opinion, so it wasn't such a bad error); and 2) I realized that I could have avoided the error by making the words a cut-out within the banner shape, cutting that out of black cardstock, and then cutting out a solid same-sized banner shape from the ledger paper and gluing it to the back of the black banner shape with the cut-out words. I'm glad I didn't figure out lesson #2 earlier, though, as I do like that sideways word, which would never have happened if I had already learned lesson #2.
So...there you have it, my first post of 2012. If anyone is actually reading this, please feel free to leave a comment if there's anything specific you'd like to see me post about this year and I'll do my best to incorporate requests in my 2012 blogging.
Hope your 2012 is off to a good start!
Subscribe to:
Posts (Atom)